Friday, January 27, 2017

FRIDAY FREEBIE - Organization


Every time I've needed to organize something in the studio, I've turned to the recycle bin. I initially saved four of these boxes to use in the Project Life organization. I've not started that project yet, not since turning the purchased cart for Project Life into the dog food storage in the kitchen. LOL 

While making cards yesterday, I needed some of my SU enamel dots. I've purchased at least two packages of each color as well as four packages of the ones from Halloween Night (Holiday catalog 2016). The packaging they come in is a bit bulky and I had multiple packages of each color. 

Being the 'flipper' that I am, I decided having them in a file system would work better for me, I could keep them on the work table at the ready and know when I was getting low on a color family so that I could make a note to add them to my next order. 

I do keep most all of my bling/ embellishments in my ScrapRack but my Stampin' Up products are kept separate - mostly on my cart (WM version of a Rascog) or in a 2-drawer open metal drawer system I got at Office Depot. 

This is what I came up with: 


I opened the box completely and laid it flat on a piece of Designer Series Paper and traced around it. Then I cut the shape out, glued the paper to the box then glued the box back together. The tabs were cut from misc. thin chipboard packaging from my stash using the tabs framelit dies (retired SU). I used the labels from the enamel dot packaging to identify each category (and yes, they are in alphabetical order - darned OCD!)

Next I used little price squares from the office supply and coded each acetate sheet of dots.


This was one of the first ones I did. All the subsequent stickers are marked with the first letter of the color family THEN the color name... and they are filed in order they are listed in the catalog (darned OCD again!) This way I don't have to remember the color name. Some of them are very close in tone. 

So there's my organization piece for this week.

How do you store your enamel dots.
Creative Blessings!
~Kelly


Wednesday, January 25, 2017

WOYWW - 399 - MERRY CHRISTMAS!


Christmas Card Throwdown - CCTO2

After tracking the challenges at Christmas Card Throwdown for over two years, I'm finally playing this week.
This week was a Color Challenge. We were to use:
Cream, Aqua, Brown

Well, as you can see, I used white so I'll be remaking this card before I link up at CCT.  (I've retaken the photo and although it still looks white, I did use Recollections Cream) LOL
But I like the way the card came out.
I used Stampin' UP! -  Flurry of Wishes and Big On Christmas (retired)
This particular card used SU- Whisper White, Tempting Turquoise and Chocolate Chip
Using the Triple Stamping Method, I stamped the two white mats then layered with the Tempting Turquoise. Instead of using the snowman face, I masked the image off, leaving a blank space between the N and W. Then popped up a snowflake. I then stamped just the hat from the snowman image and added it to the snowflake with a mini glue dot. 

And This is the aftermath for WOYWW


I use the grid paper pad from SU a lot. I block off A2 card blocks and use those to track matt dimensions, colors, stamps used. The two photo boxes hold stamps.. one is current sets I'm using and the other box holds just the sets from the 2017 Occasions and Sale A Bration catalogs.
A bit of a mess this week but I need to focus on two articles due this weekend.

That's my desk? What's on yours? When you are done visiting me in the Ozarks, please hop on over to Stamping Ground where Miss Julia has a long list of other studios you can peek into. No standing on an up-turned milk pail to look in the window. We open the doors wide and welcome you.  Please leave your number and you'll be among the first on my list.


Friday, January 20, 2017

FRIDAY FREEBIE - Planner


My 2017 Daily Planner!

I am so excited to work with my new planner. As in past years, I put this one together myself using various products available on-line as well as my own creations.

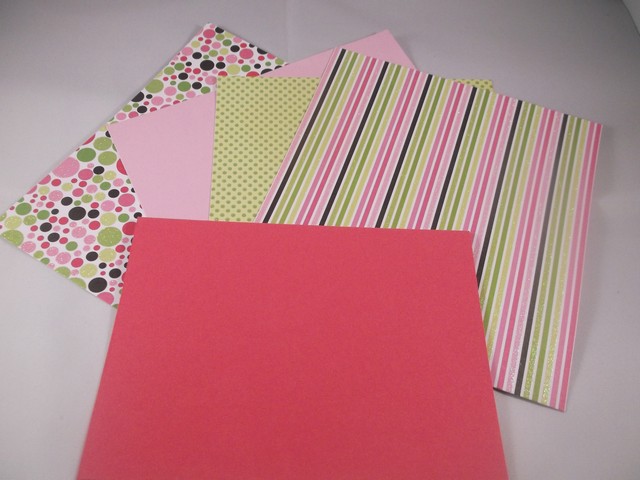
To start with, I'm a vintage gal through and through. I fell in love with this paper from KaiserCraft - their 'Time Piece' collection.  The Proud Product Planner sticker is from The Reset Girl. I love Cori's perspective on things and her vintage line speaks to my heart. I can't remember if the doily is from Cori's sheet as well or if that was from Simple Stories.  The coil binding is 1.25" white from American Crafts. This color/ size was being discontinued so I bought several packages. I have about 10 pages too many for everything to fit comfortably. I do have quite a bit of bulge but I'll explain in a minute how I'm counter-acting that. For the time being, when the planner isn't in use, I'm keeping everything secure with a white elastic headband from Dollar Tree.

Let's take a walk through my planner:


This is my Month On Two Pages that I purchased from Alexis Giostra aka Miss Trenchcoat at Strange & Charmed Whether you are a planner girl, want to succeed with a 'side hustle' or just need some positive motivation, Alexis is the lady you want in your corner. Her YouTube videos and on-line courses are amazing. She has really helped me organize my thoughts and my business. I've decorated the page with a larger Month tag from The Paper Studio 'create your own calendar' sticker pack. I purchased mine at Hobby Lobby near the Happy Planners. The sticker in the bottom is from The Reset Girl through the Carpe Diem planner line. I've placed the sticker for the coming month in the bottom right corner of each month... so February has a March calendar. 


This is my Social Media Tracker. I have everything listed that I need to do daily in the right hand column then across the top, Monday - Friday. Between my job as Marketing Director for not one, but TWO publications, my personal writing, Stampin' Up dem and creative avenues, I have a lot. BUT, here's the thing. None of them take but a few minutes to deal with each morning. I just work my way down the list and take care of the important stuff, delete the junk I don't need in my email then move on with my day. And I have stamps I can use to 'check' items off just to give me some play time LOL


This is my Day On One Page. I've designed this in Microsoft Works to fit my needs. On the left hand side, there are several boxes. The first one is for tracking Writing Group challenges. 

The second box is for personal tracking of New Words written and Pages Edited.  These two boxes are important visuals for me to not get lost in business and forget to do my own fiction writing. 

The third box pertains to creative challenges on Splitcoast Stampers. I participate in 2 challenges and moderate the third one. This gives me a spot to put the Keywords so when I upload cards for the challenges, I don't have to go back and hunt up the keyword.

The fourth box is for personal well-being. The first sticker is from Plan With Samia. I found several great stickers in her Etsy shop.  I especially like the meditation reminder. Most of the time I dive right into work and forget to take a breather.  Below her sticker I've added lines for noting the number of steps, treadmill and Wii Fitness. I don't do all three every day but my CopperFit step tracker is on my wrist every day. The link takes you to HSN but I got mine at Dollar General for the same price. The final sticker (shown) is my water tracker from Glitz Paper Co  Ashley offers a lot of free downloads for planners.. this was one of them. I have a lot of her stickers. Another one I have but isn't shown is a pill capsule. Since the picture was taken I've placed a capsule sticker across from the Plan With Samia sticker as a reminder to take my vitamins every day. Some days remembering is easier than others. I get busy, I forget.. but my planner is always in view on my desk so if I've not marked something off, then I know I need to take care of the task. 

The entire right column is a To Do.. for making notes about specifics I need to do/ calls/ emails that I've addressed. I will be adding a Top 3 sticker to each page. I can't remember which company I am planning to use. but I have several to choose from. That's probably why they aren't there yet... decisions decisions decisions.

I have a book mark that moves through the month.The bookmark has a graphic of my 'daily time table' attached.  


Now remember when I told you earlier I had a plan for whittling down the number of pages? Here it is:


I have placed a note-sheet from a We R Memory Keepers paper slab, part of their Typeset line. At the end of each month, I'll recap the month's events on here, then remove any of the daily pages I no longer need to refer to. As the year progresses, the number of pages will be eliminated, reducing the bulk. 

So how many pages exactly do I have in this planner?

12 Month on two pages (24)
Social Media Tracker (52)
Monthly Recap (12)
Daily To Do (183 -printed double-sided)
Front & Back Cover (2 - laminated)
Book Mark (1 - laminated)
Pocket page (1)

275 pages total! The 1.25 coil should accommodate around 200-250.. so yeah, I have pushed the envelope just a bit. LOL

So that's how I keep on track. What do you use? Link me to your planner. I'd love to see!
Creative Blessings
~Kelly


Thursday, January 19, 2017

THURSDAY THREADS


For my first Thursday Threads post of 2017, I wanted to show you the beginnings (or maybe the leftovers) for the Mitten Tree project. As a refresher, the Mitten Tree is a Christmas tree placed in our bank foyer every year right after Halloween. Patrons drop off socks, mittens/ gloves, scarves and hats for the local school children. Bank employees take them to the grade-school office a day or two before Christmas break. Shannon Co, MO ranks in the top 3 poverty counties in the state. 

While we can drop off individual items, I remember being one of those children and wished I had matching sets like some of the other kids. So I purchase hats/ gloves in sets then crochet a matching scarf for each set. Last year, there were almost no hats to be found on clearance so I purchased enough yarn to use the Knifty Knitter to make those as well. Winter items are going on clearance now so when I go shopping later this week, I'll try to pick up as many hats as I can. 

The stash in the picture above is stored in one of these:


This is an Under the Bed Shoe Bag. The 22.75" x 28.5" x 5.5" is designed to hold 12 pairs of shoes. And that is originally what I purchased it for last year. But I've since turned a 5-shelf book case into a shoe/ purse cabinet so was able to re-purpose this. Mine is now holding the gloves I purchased last 
year:


28 pr. Cream
21 pr. Brown
3 pr Hot Pink
2 pr. Black
5 pr. White
4 pr Gray (with hats)

And all the yarn needed to complete the sets. These are what I did last year before things went haywire around here. I decided to hang on to them as 'seed' for this year's:


Because I know the arthritis in my right hand will give me fits if I just crochet, I'll be mixing the Thursday Threads post with updates on the Mitten Tree, Embroidery Projects and Rug making. I have some rugs I've wanted to make for the house for awhile now and I've decided this is the year some of these projects get completed. 

What is in your Un-Finished Objects project basket? Please share and let's encourage each other!
Creative Blessings!
Kelly


Wednesday, January 18, 2017

WOYWW - #398


I'm thrilled to be back with the WOYWW (What's On Your Workdesk Wednesday). I have missed visiting my friends all over the world. To kick off 2017, my desk is reasonably clean but that's because I cleared off the previous project remains last night so I'd have a clear start this morning.

I spent six weeks getting most of the studio in order. I know where everything is and I have room to work. In the foreground you'll see my return address labels. I have bills to write this morning and get ready for the mail. Blah! Ahead of that you'll see the package of the Pretty Pocket Card Kit from the SU Sale A Bration catalog.

Just to the left of that pile, you can see the corner of my tool lazy susan and a decorative letter box that holds all of my adhesive options for projects. The blue pyramid of tubes in the back is a marker holder my husband made for me to hold all of my Stampin' Up markers. Paper trimmer is on top of a variety of magazine holders that contain In Color cardstock, current Designer Series Paper and one holds paper backing from contact paper (makes a great non-stick surface similar to a crafting mat for some things, stamping off scrap papers, piercing mat and cutting board. Nearly everything I need to work on projects is at my fingertips!

The white box on the end is my new Photo Box. When I'm done with pictures this weekend, I can fold that flat and store it under the work table. The lamps (there are 2) will collapse and go back in their boxes. 

Finally in the far left of the picture you'll see my two blog post tracking boards. I'm finally organized and creating... and it feels FABULOUS!

That's my desk? What's on yours? When you are done visiting me in the Ozarks, please hop on over to Stamping Ground where Miss Julia has a long list of other studios you can peek into. No standing on an up-turned milk pail to look in the window. We open the doors wide and welcome you.  Please leave your number and you'll be among the first on my list.

Tuesday, January 17, 2017

TEAPOT TUESDAY - Balloons & Butterflies!


Now that I have a place to create I'm anxious to share my cards with the world. One FABULOUS place to do that is being a member of the Teapotters at Splitcoast Stampers. Teapot Tuesday is a weekly challenge where we create a card with someone in mind... someone who could use a bit of cheer or encouragement. The Teapotters have been there for me on more than one occasion, sharing their creative cards with friends of mine who needed Happy Mail at a critical time in their life. You do not have to play every week, you don't even have to send the cards. Build your stash, challenge yourself or bring a smile or comfort to someone you do not know.

This week our Destination Station is for Rylee Bernosky - sweet 6-year old who's been diagnosed with brain cancer. She loves to go with her grandma to check the mail - so grandma got Rylee her very own PO Box so now she has mail to check, too!  You can read Rylee's story HERE

I had my granddaughters in mind when I designed this card. They love kitties, balloons and butterflies. (though Adrian was afraid of them when she was 3. She thought they were bees. hehe) Adrian is now 9 and Abigail is 5. they grow up way too fast.

So here's the card wining it's way to Rylee tomorrow:

front

inside

To lighten up the kitty image, I inked the stamp in Melon Mambo then stamped it off on scrap paper 3 times.. stamping the 4th time on the inside card mat. Gave the kitty a very soft effect rather than a pink cat LOL


I chose the Uptown Flair stack from The Paper Studios:

And these papers from the stack as well as Melon Mambo for the card base:


These punches from SU: (pay no attention to the reflection in the Duo Banner punch)

Duo Banner, Bitty Butterfly, Balloon Duo

I used stamps from the August 2016 Paper Pumpkin, Balloon Adventures and Pretty Kitty

I used a strip of the frosted pink (shown in the picture above) and stamped the streamers in Melon Mambo. then punched three bitty butterflies from the strip. 


I added bits of misc. bling from my stash, popped up one of the balloons and the banner sentiment.

The sentiment is a straight-line stamp but because it is a photopolymer, I was able to curve the image to fit the curvature of the banner.  How cool is that!

I hope this card brings a smile to Rylee. Cancer is a horrible experience for anyone but no child should ever have to take this journey. I hope you'll join me at the Destination Station and share a smile with her, too.

Creative Blessings!
Kelly 


Monday, January 16, 2017

COLOR CHALLENGE #1

Now that the studio is mostly organized and I can create, I want to spiff up the blog a bit.

I have been Pinning color combinations on Pinterest for a couple of years. So I'm going to begin sharing those.

Beginning this week, I will post a Color Challenge the 3rd Monday of every month. By February I hope to have a linky system set up that we can link you up directly. In the mean time, I invite you to play along and post a link in the comments section.

Keyword: KellysColorChallenge1

Please share the blog post link on your blog. (I hope to also have a blog button in place by February) so others can play.

RULES:
There aren't any rules. You may use any company product you like. My only request is if you use a stamp or something special, link to the company so we may add to our stash, too :-D

Here's our first Color Challenge of 2017!!


Courtesy of design seeds

I chose this sketch from my PP- Sketch It! Pinterest Board. The link to PaperSecrets no longer works:

Paper Secrets: September 7th Card Sketch - due 9/14:

And here's my card:


The closest I could come to the colors:
Wisteria Wonder
Elegant Eggplant  (ink)
Night of Navy
Perfect Plum. 
I had planned to us Blushing Bride but the color tones just fell in to place as they were.

I used DCWV One Upon A Time DSP, the sentiment is from BYOP (SU) and the moth is from 7-Gypsies.


Thursday, January 12, 2017

Kicking off the New Year...

ORGANIZED!

I spent ten days after Christmas FINALLY making serious progress in making the studio useable. I'm almost there. LOL

I'm hostessing the AOCC17 Challenge over at Splitcoast Stampers.. That is All Occasion Card Challenge. The object is to not just make cards for people we love but to pop them in the mail, or hand them off in a timely fashion. Doing that requires some organization.

In the past I've had a monthly list of people I want to send cards to... in my planner. Yet the cards seldom got made, let alone mailed. Sometimes I'd even remember to wish them Happy Birthday or Happy Anniversary. I decided that this year, along with the rest of my organization, this would be one of the changes I wanted to make.

So here's what I came up with:


I'm using a photo box from Hobby Lobby (did you know they are approx 1/8" narrower than the Recollections boxes from Michaels?)

Since this wasn't an SU project and needed to be more functional than pretty, I chose to use Recollections cardstock:


I selected six colors that kind of coordinated with the month and cut two from each color.


4.5"


7"


Scraps - I'll use these to make cards

Then I used the File Tabs dies (Retired SU):


The tabs are shorter than the paper but once they were die cut, trimming them the rest of the way with scissors only took a second.

For now, I'm leaving them 'raw'. If this works out as I hope, then I'll laminate the dividers - thanks to the trusty laminate machine Bob got me for Christmas :-D

The most time consuming part of this project was typing up the Birthdays and Anniversaries onto cards that would fit behind each tab. I used the Avery print program  and the Note Card layout:


I used one note card for family/ friends and one for group members/ crafters. So I have two 'tickler' cards behind each monthly tab.

Here's a close- up:


Now I have the list right in the card box. As I make cards for various challenges, I can keep future recipients in mind and file the card in the appropriate month as I go. When the time comes, the cards will be there ready to mail. 

How do you coordinate your Card list with the cards you make? I'd love to hear your ideas!
Creative Blessings!
Kel


Sunday, January 1, 2017

HAPPY NEW YEAR!


Happy New Year!

I know I've been absent for several weeks. I just needed to put social media on hold to get through the holidays and put life on track.  Thank you for your patience. 

I have some great projects lined up. My first post for 2017 should go up on Friday then we get on a roll from there ::: crossing fingers :::

I do have a new job. Aside from selling Stampin' UP as a hobby dem, I am now Director of Marketing for a publishing company. Part of my job is to train the authors on how to market themselves and I'm starting with a blank slate to put this department together.

That is going to limit my blogging time for a bit but I'm only scaling back on a couple of blogs. My creative blogs are very important to me and will take priority over the others. 

Please bear with me as I get back on track. I look forward to showing you some cute projects, but more importantly INSPIRING you to do your own thing.

Creative Blessings!